
Git is one of the difficult subjects to begin for self-taught web developers. If you have just started to work with a team, then knowing Git is very important. This tutorial is for you if you've perpetually worked alone and wanted an illustration about how to get started with Git.
Goals
- Learn about Git.
- Learn about Git commands.
- Deploy to live server using the Git Commands.
1. What is Git?
Git is a distributed version control system (VCS) for code which is used for tracking changes in source-code to keep track of revisions during software development, and it allows a developer or development team to coordinate work on a project through different branches. It helps keep track of the history with why and when the code was changed.
2. Concepts of Git
- Keeps track of history.
- Takes
snapshotsof your files. - You decide when to take a snapshot by making a
commit. - You can visit any snapshot at any time.
- You can also stage files before making a commit.
3. Basic Commands
The following are the basic git commands which you'll be using.
git init- This is used to initialize a repository.git config- This will help you configure name, email etc.git clone- This will clone the remote repository to a directory.git add <file>- This will add file(s) to an index.git status- To check the status of the repo in the staging area, which is your local.git commit- This will commit changes to the index.git push- This will push your committed changes to the remote repository.git pull- This will pull the latest changes from the remote repository.git merge- Merge changes from one branch to other.git remote- List if the repo is added to any remote repo.git checkout- Checkout to another branch.
4. Installing Git
4.1 Linux(Debian)
$ sudo apt-get install git4.2 Mac
The easiest way to install Git in Mac is probably to install the Xcode Command Line Tools. Run the below code in your terminal.
$ git --versionIf git is not already installed, then it will prompt you to install it.
Alternately you can install git by following the link. Download Git for mac
4.3 Windows
You can download and install git in windows from the link below. Download Git for Windows
5. Working with Version Control or git
5.1 Creating a directory/folder and adding files in the directory
In order to create a folder run the below code
$ mkdir git-guide
mkdir- Make a directory or create a directory
Then go into the new directory.
$ cd git-guide
cd- change directory
Create two files in the directory
$ touch index.js index.html
touch- This will create a file
Open the files in your favourite text editor and add some code/scripts into the files.
index.html:
<!DOCTYPE html>
<html lang="en">
  <head>
    <meta charset="UTF-8" />
    <meta name="viewport" content="width=device-width, initial-scale=1.0" />
    <title>Document</title>
  </head>
  <body></body>
</html>
index.js:
//this is a javascript file
5.2 Initializing Git in a directory
In order to initialize git in the directory run below command
$ git initUpon running the above command, you'll see output something like below. It will create .git folder inside git-guide folder. Don't worry about the contents of .git folder as it is not important to know all that.
Initialized empty Git repository in /Users/pratapsharma/personal/projects/git-guide/.git/5.3 Adding your name and email to git
Before you go further, you will want to add your name and email to git, in order to do that you will use git config command. Run the below code in your terminal(change name and email as per your details).
$ git config --global user.name 'Pratap'
$ git config --global user.email 'iam@pratapsharma.io'
5.4 Add files to the index
Now we have added the user details to git. Now let us add the two files which we created earlier to git. Before doing anything, let us see what the status of our current index/repository is.
$ git statusOutput:
On branch master

No commits yet

Untracked files:
  (use "git add <file>..." to include in what will be committed)
        index.html
        index.js

nothing added to commit but untracked files present (use "git add" to track)
We can see index.html and index.js are not tracked yet. Which means we haven't added the files to the repository index.
Let us add the file to the repository index.
$ git add index.htmlAfter adding the file, check the status again.
$ git statusOutput:
On branch master

No commits yet

Changes to be committed:
  (use "git rm --cached <file>..." to unstage)
        new file:   index.html

Untracked files:
  (use "git add <file>..." to include in what will be committed)
        index.js
Just in case if you want to remove index.html file from the staging area, then you can run
$ git rm --cached index.htmlAfter removing the file from the stage area, check the status again. Output:
On branch master

No commits yet

Untracked files:
  (use "git add <file>..." to include in what will be committed)
        index.html
        index.js

nothing added to commit but untracked files present (use "git add" to track)
Now you see both the files are untracked again.
There are multiple ways of adding files to a staging area.
git add *.html- This will add all the files ending with.html.git add .- This will add all the files.git add -A- This will also add all the files.
Run the command to add all the files to the staging area and see the output.
$ git add .Output:
On branch master

No commits yet

Changes to be committed:
  (use "git rm --cached <file>..." to unstage)
        new file:   index.html
        new file:   index.js
For a reference, add a new line in index.html file and check the status again.
$ git statusOutput:
On branch master

No commits yet

Changes to be committed:
  (use "git rm --cached <file>..." to unstage)
        new file:   index.html
        new file:   index.js

Changes not staged for commit:
  (use "git add <file>..." to update what will be committed)
  (use "git restore <file>..." to discard changes in working directory)
        modified:   index.html
You can see that index.html file is showing as modified.
Follow the previous steps of adding the changes again by running git add . and see the output.
On branch master

No commits yet

Changes to be committed:
  (use "git rm --cached <file>..." to unstage)
        new file:   index.html
        new file:   index.js
Did you see that it's saying Changes to be committed? It is because we haven't committed our changes yet.
5.6 Committing files to the index
Let us now commit our changes. To commit the changes run:
$ git commit -m 'Initial commit'
git commit -m 'Initial commit'--mmeans message, and we pass message inside the '' quote. Initial commit is my message.
Output:
[master (root-commit) 53b312c] inital commit
 2 files changed, 12 insertions(+)
 create mode 100644 index.html
 create mode 100644 index.js
The output above is self-explanatory and shows how many files were changed, how many lines of code were inserted or removed etc. Check the status again.
$ git status

On branch master
nothing to commit, working tree clean
It's shwoing nothing to commit as we have already committed all our changes.
Let us go ahead and make some changes to index.js. Add a couple of lines to the file. I'll add the following lines.
const a = 8;
const b = 2;

console.log(a + b);
Now run git status in your terminal.
Output:
On branch master
Changes not staged for commit:
  (use "git add <file>..." to update what will be committed)
  (use "git restore <file>..." to discard changes in working directory)
        modified:   index.js
You see index.js file is modified. Go ahead and add the file to staging and make a commit again.
$ git add .
$ git commit -m 'Changes in index.js'
6. Git branches
Let's say that you are a developer working on a project with a bunch of teams and you've been assigned a task of adding login. You won't want to start making changes and push to the remote repository and have the main code base edited and changed without finishing the part of the functionality. So what you could do is create a new branch called login and then work in that branch. You can still commit in that branch, but it won't affect the main codebase branch which is basically master branch.
Let us add a branch named login
$ git branch loginThis will create a new branch named login. In order to check if the branch was created run:
$ git branchOutput:
login
* master
You see, the branch was created. If you noticed *, it means that we are currently in the master branch.
Let us now checkout to the new branch which we created above. To do that run:
$ git checkout loginOutput:
Switched to branch 'login'Run the git branch command again and observe the output
* login
  master
You can see that we are in the login branch now.
So far, so good. Now let's add a new file named login.js and add a few lines in the file. Also, make a minor change in index.html file just to demonstrate we are working with the login functionality and run git status command to see what is going on.
Output:
On branch login
Changes not staged for commit:
  (use "git add <file>..." to update what will be committed)
  (use "git restore <file>..." to discard changes in working directory)
        modified:   index.html

Untracked files:
  (use "git add <file>..." to include in what will be committed)
        login.js

no changes added to commit (use "git add" and/or "git commit -a")
Now let us add the file and commit the changes to the staging area.
$ git add .
$ git commit -m 'Adding login functionality'
As of now, we have added a new file login.js with some minor changes in index.html.
Run the below command to list all contents in the current branch.
$ ls
ls- This command will list all the contents/item in the current directory.
Output:
index.html index.js login.jsIn order to see the difference in the two branches, checkout to the master branch and run the above command again and see the output.
$ git checkout master
$ ls
Output:
index.html index.jsYou see the newly created file login.js is missing. It is because we added that file in the login branch.
Now let us assume we have completed the login functionality and we want to merge the changes of login branch to master branch. To do that, make sure you are in master branch and run the below command.
$ git merge loginRun the ls command and see that we can now see the files of login branch in the master branch.
$ lsOutput:
index.html index.js login.jsThere are a lot more into branching and merging if you want to get complicated. But I want to keep this simple as this guide is for beginners.
7. Working with remote repositories
Now let us go to Github. If you haven't created an account yet, then please create an account(It's always free).
Git is not GitHub. Git is the system, and GitHub is a repository hosting service (the most popular of many).
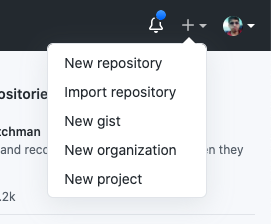
After successfully creating an account now click onadd button on the top right corner and select New Repository.
A new screen will open. Fill the details as below. and click on Create repository button.
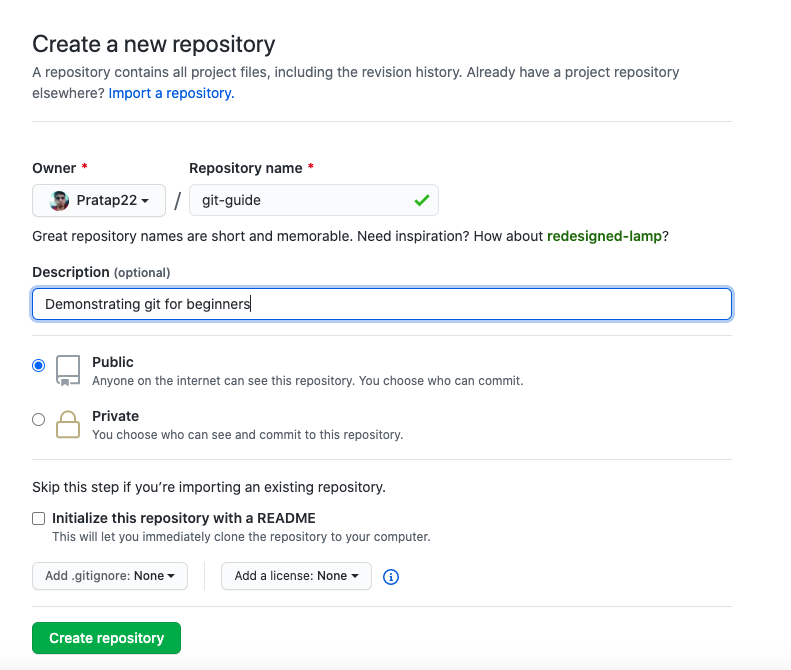
public- Anyone can see it.private- Only authorised can see it.
Once the repository is created, you'll see a screen like this. As of now, it has nothing in it. It gives you a message and tells you what exactly to do.
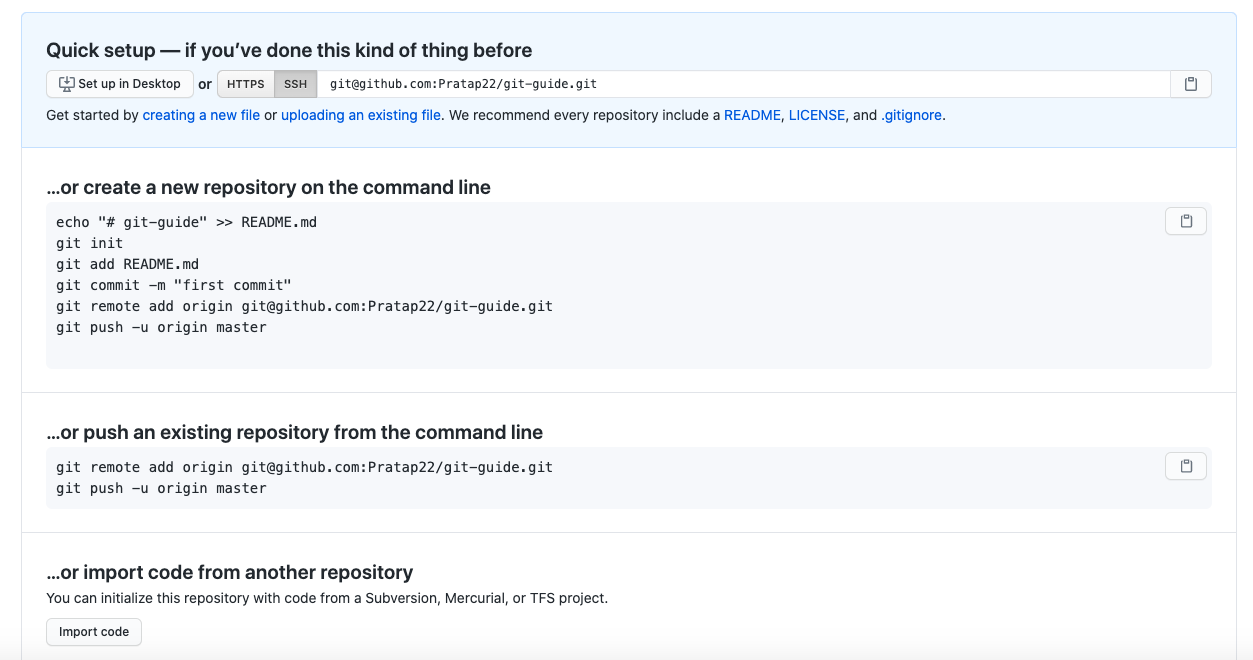
As the message suggested, we have already done those things except for the last two lines.
$ git init
$ git commit -m "first commit"
$ git remote add origin https://github.com/Pratap22/git-guide.git
$ git push -u origin master
In order to check if we have already added a remote repository run the command.
$ git remoteWe get nothing in the output as we haven't added any remote repository. Let us now add a remote repository by running the code as suggested by git.
$ git remote add origin https://github.com/Pratap22/git-guide.gitOnce you run the above command run git remote again and see the output.
originWhich means that now we have the remote repository added. Now run the below code to push the local files to a remote repository.
$ git push -u origin masterIt will open a pop-up and ask you to log in to GitHub account. After successfully logging in, it will push to the repository to the master branch.
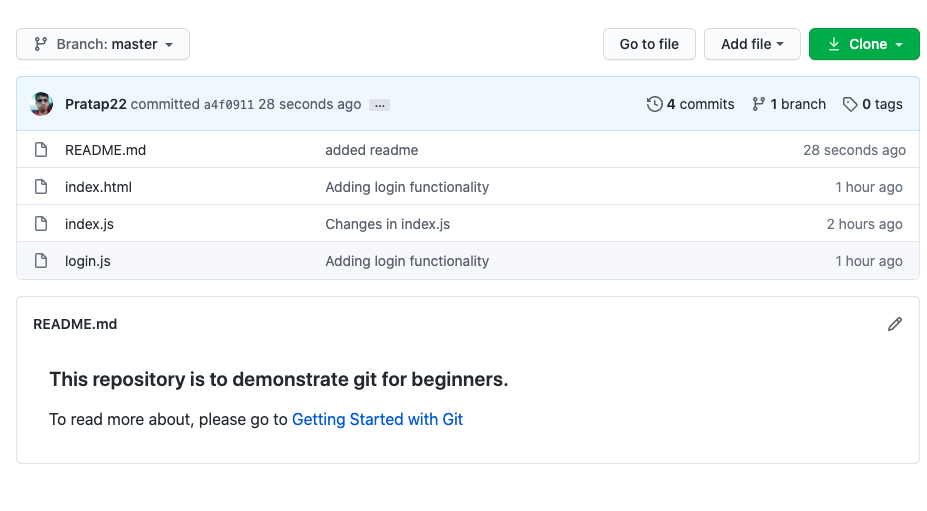
To make sure the files were added to a remote repository, refresh the browser, and you'll see all the files are now in a remote.
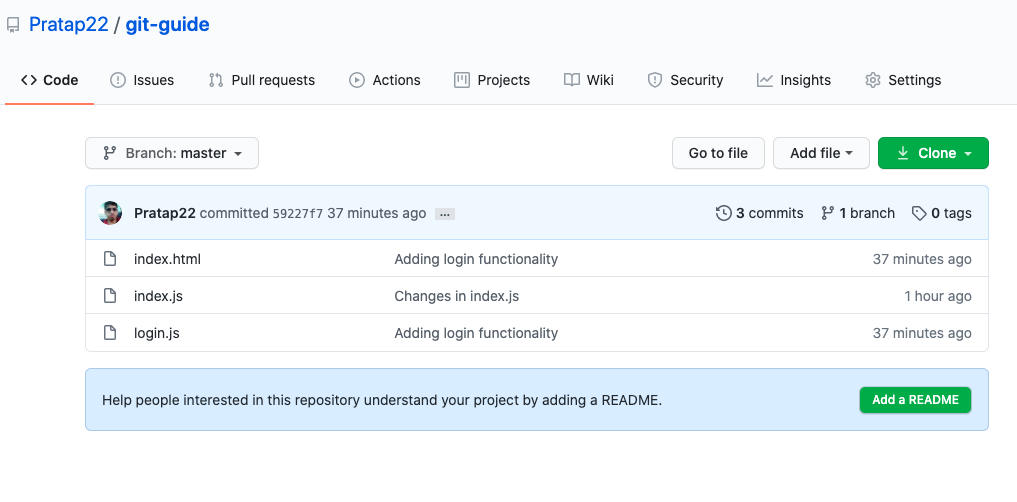
As you can see on the page:
 It is suggesting us to add a README. Let us go ahead and that file.
$ touch README.mdAdd the following in the readme file
### This repository is to demonstrate git for beginners.

To read more about, please go to <a href="/getting-started-with-git" target="_blank">Getting Started with Git</a>
Run the following command to add, commit and push the changes to remote.
$ git add .
$ git commit -m 'added readme'
$ git push
Once completing this, refresh the browser.
8. Cloning a repository
If someone wants the code, they can clone the repository. To clone a repository. Click on clone button. Here you have an option to download as a zip file too. But we'll go and copy the link.
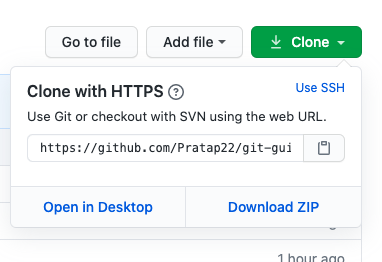
Then in order to clone the remote repository run the below command. Make sure you are in a new folder:
$ mkdir temp
$ cd temp
$ git clone https://github.com/Pratap22/git-guide.git
Output:
Cloning into 'git-guide'...
remote: Enumerating objects: 14, done.
remote: Counting objects: 100% (14/14), done.
remote: Compressing objects: 100% (11/11), done.
remote: Total 14 (delta 2), reused 13 (delta 1), pack-reused 0
Unpacking objects: 100% (14/14), done.
Run ls in the current directory you'll see that a new folder with git-guide is created. It pulls the entire folder in.
$ lsOutput:
git-guideIf you open the folder, then you'll see the entire files in the folder.
As long as the repository is public you can clone anybody project.
Suppose you are working in a team and someone makes changes and push those changes to the remote repository. Then you can get the new changes by running:
$ git pullConclusion
So far we have learned:
- Initialise a repository.
- Add files to the staging area.
- Commit the added files to staging area.
- Push the committed files to remote repository.
- Create a new branch.
- Merge changes of branch1 to branch2.
- Clone a repository.
- Pull changes from remote repository.
I hope this article will help you grasp the concepts of `git.
You may also like my other articles:
- Strapi.js - Open Source Node.js Headless CMS
- Things to keep in mind before starting Javascript framework
- ES2020/ES10: The Next Big Update! Awesome New JavaScript Features With Examples
If you liked the article, feel free to share it to help others find it!
You may also follow me on LinkedIn and X.
💌 If you’d like to receive more tutorials in your inbox, you can sign up for the newsletter here.
Discussions