
If you're looking for a complete SQL guide for beginners with examples, this guide is a great way to learn SQL basics. Just follow through, and you'll be able to write SQL queries in no time.
Structured Query Language (SQL), is a query language used by software developers, data scientists and anyone who works with data. With SQL, you can store data in relational databases and write queries to extract valuable information.
There are various DataBase Management Systems (DBMS) that support SQL, but each product has its implementation of SQL. In this beginners guide, we'll be using MySQL to learn the SQL language. It is the most famous free and open-source DataBase Management System(DBMS) in the world. If you use a different DBMS (e.g. SQL Server), you can still benefit from this guide as 90% of the skills you'll learn in this guide can be transferred to other database management systems.
Table of Contents
| Sl. No | Topic |
|---|---|
| 1. | Introduction |
| 2. | What is a Database? |
| 3. | Installing MySQL on Mac |
| 4. | Installing MySQL on Windows |
| 5. | Creating the Databases |
| 6. | The SELECT Statement |
| 7. | The SELECT Clause |
| 8. | The WHERE Clause |
| 9. | The AND, OR, and NOT Operators |
| 10. | The IN Operator |
| 11. | The BETWEEN Operator |
| 12. | The LIKE Operator |
| 13. | The REGEXP Operator |
| 14. | The IS NULL Operator |
| 15. | The ORDER BY Operator |
| 16. | The LIMIT Operator |
| 17. | Inner Joins |
| 18. | Joining Across Databases |
| 19. | Self Joins |
| 20. | Joining Multiple Tables |
| 21. | Compound Join Conditions |
| 22. | Implicit Join Syntax |
| 23. | Outer Joins |
| 24. | Outer Join Between Multiple Tables |
| 25. | Self Outer Joins |
| 26. | The USING Clause |
| 27. | Natural Joins |
| 28. | Cross Joins |
| 29. | Unions |
| 30. | Create table |
| 31. | Column Attributes |
| 32. | Inserting a Single Row |
| 33. | Inserting Multiple Rows |
| 34. | Inserting Hierarchical Rows |
| 35. | Updating a Single Row |
| 36. | Updating Multiple Rows |
| 37. | Using Subqueries in Updates |
| 38. | Deleting Rows |
Introduction
In this guide, we will learn about SQL. I'll guide you on how to install all the necessary tools and write our first SQL query. This guide is ideal for anyone who wants to learn SQL from scratch but also for those who has the required knowledge to fill in the missing gaps.
By the end of this guide, you will be able to retrieve, insert, update and delete data in databases.
This guide is still incomplete. I'll keep adding stuffs I learn. Click here to Download the database file. The tables I'm using in this guide are all mentioned here. Most of the queries are written demonstrating the tables in the database.
What we'll cover
In this guide we'll talk about:
- Tables
- Relationships
- Joins
- Subqueries
- Regular Expressions
- And much more
What is a Database
A Database is a collection of data stored in a format that can easily be accessed.
In order to manage our database, we use a software application called DataBase Management System of DBMS. We connect to DBMS and give instruction for querying or modifying data. The DBMS will execute our instructions and send the results back.
We have several DataBase Management System which is classified into relational and non-relational or NoSQL.
Relational
In the relational database, we store data in Tables which are linked to each other using relationships.
Each table store a specific type of data objects like Customers, Products, Orders etc.
SQL or Structured Query Language is the language that we use to work with Relational DataBase Management System.
E.g. of SQL Query looks like this:
SELECT * FROM products WHERE category = 'food' ORDER BY price
We use SQL to query or modify our data. In this guide, you're going to learn everything there is to know about this powerful language.
Now, there are many different Relational DataBase Management System out there. Some of the most popular ones are:
- MySQL
- SQL Server
- Oracle
But, of course, there are plenty more. Each DBMS has different flavour of SQL. But all these implementations are very similar and are based on the standard SQL specification. So, most of the SQL code that you'll learn in this guide will work in any DBMS.
In this guide we'll be using MySQL which is the most popular, open source database in the world.
Non-Relational or noSQL
In non-relational databases, we don't have tables or relationships. These databases are very different for relational databases. The non-Relational database does not understand SQL; they have their own query language.
So, we use SQL to work with Relational DBMS.
Installing MySQL on Mac
In this section, I'll help you how to install MySql in your Mac system.
Well, it consists of two download process:
- MySQL Server
- MySQL GUI (Can be done using terminal)
Downloading MySQL server
To install MySQL Server on mac click the linkMySQL Server for Mac.
Select DMG Archive which comes first in the list and click download. A new screen will come and click No thanks, just start my download. button. It will start the download process.
Once the Dmg file is downloaded. Open the file which will open an installation wizard. Follow the installation process, which is pretty simple.
Once you reach to configuration tab it will ask you to create a password for the root user. Set a complex password and click finish.
That was super easy.
Downloading MySQL GUI
We need this graphical tool to manage our databases. To install MySQL GUI on mac click the linkMySQL GUI for Mac.
Select DMG Archive which comes first in the list and click download. A new screen will come and click No thanks, just start my download. button. It will start the download process.
Once the Dmg file is downloaded. Open the file which will open an installation wizard. Follow the installation process which is pretty simple.
That was easy too.
Now, open MySQLWorkBench in your system. This is how the work bench looks like.

Once you open the Workbench, now let us create MySQL connections by clicking on the + button near My Connection in the image above. It will open another screen as below and give the connection a name of your own (Local Instance in my case).
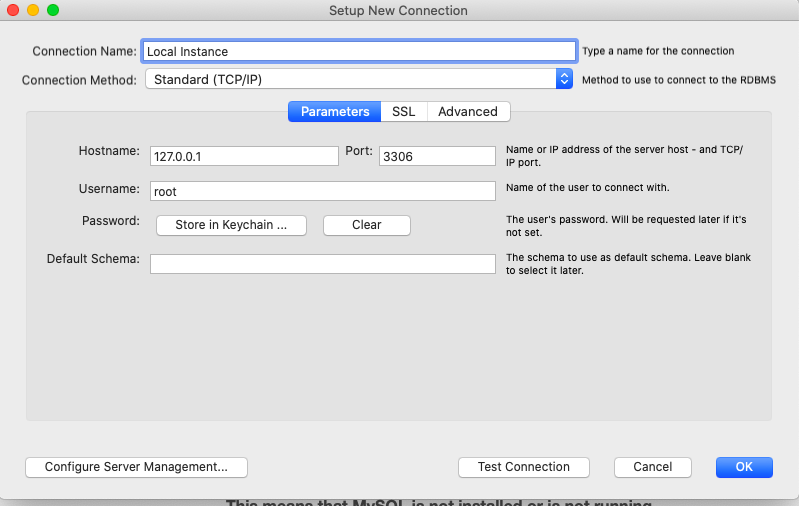
In the password section enter the password which you used while installing MySQL server.
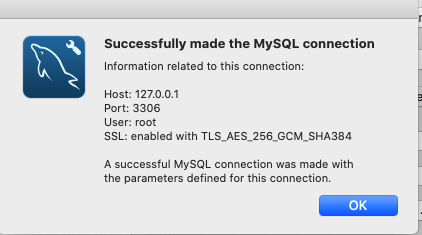
Do not change other parameters. Once doing all the changes you may test the connection by clicking on
Test Connection. If the connection is successfull then you'll see something like this:
Note: Just incase the connection failed. It is probably because the server was not started. To start the server run the below command from your terminal.
$ sudo /usr/local/mysql/support-files/mysql.server start
This concludes installation process for Mac users.
Installing MySQL on Windows
In this section, I'll help you with the installation process of MySQL on your Windows system.
Well, unline Mac windows consists of the single installation process which is MySQL Installer
To install MySQL on windows click the linkMySQL for Windows.
Select MySQL installer for Windows which opens a new screen then select the first in the list and click download. A new screen will come and click No thanks, just start my download. button. It will start the download process.
Open the downloaded file which will open an installation wizard. Follow the installation process, which is pretty simple.
It will prompt you for the applications which will be installed.
- MySQL server
- MySQL Workbench is all that we need.
Continue clicking next until it prompts your for a password.
Once you reach to configuration tab it will ask you to create a password for the root user. Set a complex password and click finish.
That was super easy.
Now, open MySQLWorkBench in your system.
As I'm using Mac system, I am not able to provide you with screenshots.
Once you open the Workbench, now let us create MySQL connections by clicking on the + button near My Connection in the image above. It will open another screen as below and give the connection a name of your own (Local Instance in my case).
In the password, section enter the password which you used while installing MySQL server.
Do not change other parameters. Once doing all the changes, you may test the connection by clicking on
Test Connection.
This concludes the installation process for Windows users.
Creating the Databases
In this section, I'll guide you on how to create a Database. Open your MySQL workbench and select the connection which we created earlier.
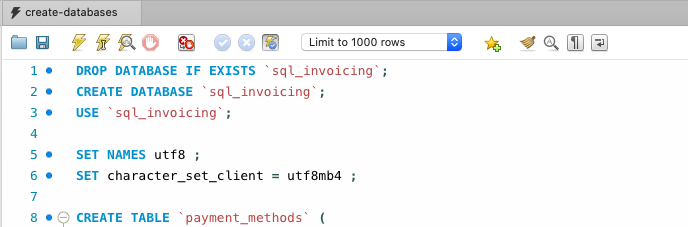
Click here to Download the database file. It contain every command which we will be executing in the upcoming sections.
Once you download the above file, open the file from the workbench.
I'll explain about the file bit-by-bit as we go along.
Click on the yellow button to execute the SQL script.
Once script execution is completed then you'll se the window with the queries which were executed.
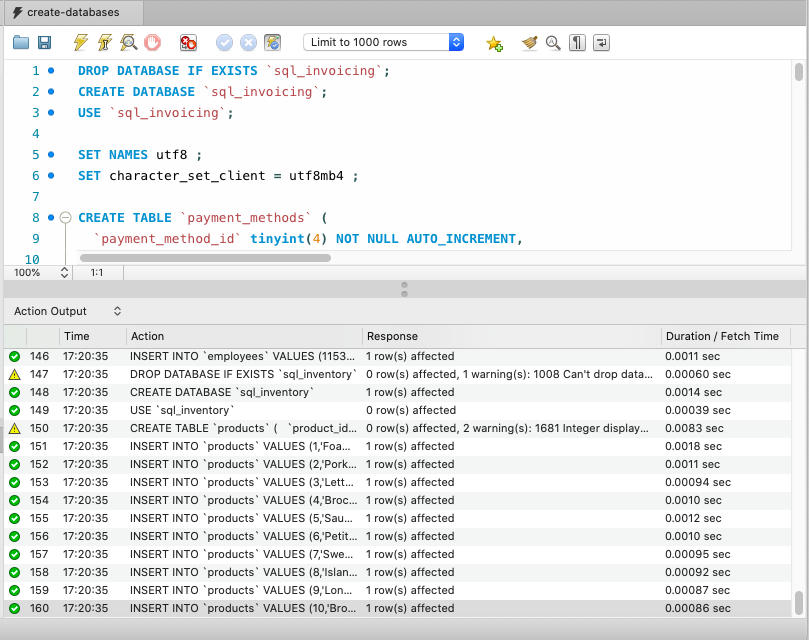
Incase of any error, it will be displayed in the action output.
Now click on refresh button which is not the left pane near Schema. Below image for reference.

Once you refresh will will see the following databases named:
- sql_hr
- sql_inventory
- sql_invoicing
- sql_sql_store
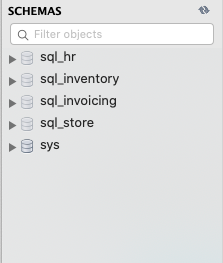
Expand and explore the database to check tables within the database.
There are all the databases/tables we will be using in this guide. So spare you couple of minutes and explore the databases.
The SELECT Statement
In this section, I'll tell you how to retrieve data from a single table.
If you check left panner in GUI none of the databases are selected. None of the databases is in bold. So the first step to writing a query to get data from a database is to select a database.
Let us select a database so that we can write a query for that database. The command to select database is:
USE sql_store;
Once you execute the query above the database named sql_store in the left panel will be turned bold denoting it is selected.
The query that we will write will be executed from the database selected above.
SQL is not a case sensitive language, and that means we can use upper case or lower case characters, but as a best practice, we should capitalize the SQL keywords and use lower case characters for everything else.
List of tables in sql_store database
- customers
- order_item_notes
- order_items
- orders
- order_statuses
- products
- shippers
Alright, let us now write our first query to retrieve all customers in the sql_store database.
To retrieve data from a table, we will use SELECT keyword followed by the columns/fields to be selected and then the table from which the column should be selected.
SELECT customer_id, first_name FROM customers;
To execute all queries press command + shift + enter in your Mac system.
In the query above, I am displaying all customers customer_id and first_name which is stored in customers table. In case I want to select all the fields/columns, then I can use * in place of the column names. E.g.:
SELECT * FROM customers;
Output: The above query displayed all the customers from the customer table.
The SELECT statement have two clauses SELECT clause and FROM clause. But there are also other clauses which we can use to filter and sort data.
Whenever you have multiple SQL statements you need to terminate each statement using a semicolon(;)
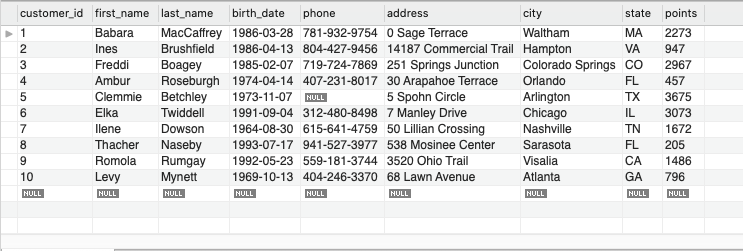
For example, we can use the WHERE clause to filter the result and get the customer with ID 1.
SELECT * FROM customers WHERE customer_id = 1;
Output:
The query above dispays customers whose customer_id = 1.
'1','Babara','MacCaffrey','1986-03-28','781-932-9754','0 Sage Terrace','Waltham','MA','2273'
Other clauses with SELECT
- ORDER BY
SELECT * FROM customers ORDER BY first_name;
Output: As you can see in the output the records are sorted based on their firstname.

Over the next few sections we're going to learn more about each of the clauses used above in detail.
Take away from this section
The order of the clauses matters, so we always have SELECT first then we have FROM, then WHERE and then finally ORDER BY. We cannot change the order of these clauses otherwise we get a syntax error. Which basically means the syntax, or the grammar, or the structure of the SQL statement is incorrect. Therefore it cannot be executed.
The SELECT Clause
In this section, we will look at the SELECT clause in detail.
What can we do with SELECT clause?
In the previous section, we learned that if we use asterisk(*) it will return all the columns. Alternatively, we can specify the columns that we want, and this is helpful in situations where you have a big table where you have many columns and perhaps a million of records. If you're going to bring back all those data, that's going to put a lot of pressure on the Database Server, in this case, MySQL server, as well as the network.
So, that's when we explicitly specify the columns that we want to get.
Still using sql_store database.
Let's say you want to get the first name, and last name columns execute the query below.
SELECT first_name, last_name FROM customers;
Output:
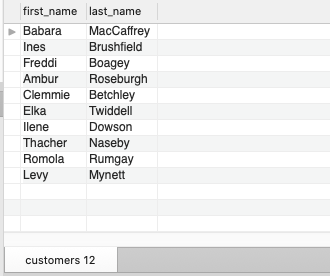
As you can see, we only get those two columns. And they are in the same order specified in the query, column first_name and then column last_name in this case.
If we change the order of the column in the query like this:
SELECT last_name, first_name FROM customers;
Output:
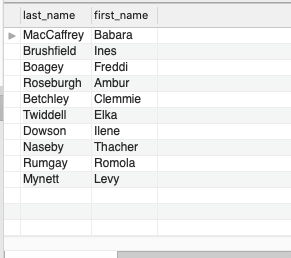
Now, we see the column last_name comes first.
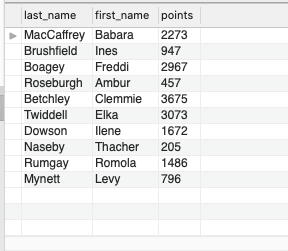
Let us add new column points to the query and execute it.
SELECT last_name, first_name, points FROM customers;
Output:
Now, let us give some discounts to each customer. To do that, observe the query and execute it.
In the last column which we are selecting it is having some operations on points. Observe the output.
SELECT last_name, first_name, points, (points + 10) * 100 FROM customers;
Output:
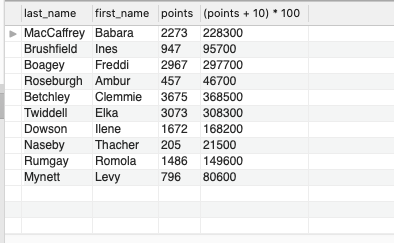
You can see that the name of the column it is set to (points + 10) * 100 which was given in the query. That doesn't quite make sense. You want to have a clear, descriptive name. So we can provide the column with an alias using the AS keyword. Let's re-write the query and execute it.
SELECT last_name, first_name, points, (points + 10) * 100 AS discount_factors FROM customers;
Output:
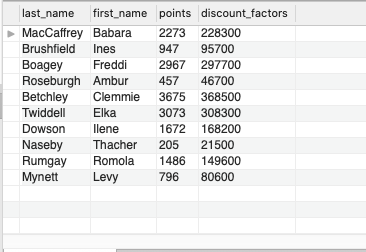
Now the name of the column has changed. So this is the benefit of using an alias, we can give descriptive names to the columns and the result sets.
Now, if you want to have space in the column name discount_factors, you need to surround it with quotes, either single quote ('') or double quotes("").
SELECT last_name, first_name, points, (points + 10) * 100 AS 'Discount Factors' FROM customers;
// Output ignored this time.
Arithmetic operators
The following are the arithmetic operators in SQL with their precedence from high to low as you go from top to bottom. Operators having same precedence are placed in the same row.
- () Parenthesis
- (/) Division, (*) Multiplication
- (+) Addition, (-) Subtraction
DISTINCT keyword
Let us assume there are duplicate records in the customers table. I mean there are customers with similar last_name. If we want to get unique last_name from the table, then we can use DISTINCT keyword. DISTINCT means unique.
SELECT DISTINCT last_name FROM customers;
This will return all the unique last_name from the table. // Output ignored this time.
Take away from this section
- To select all columns we can use
asterisk(*). - We can select specific columns.
- We can give the column a descriptive name using
ASkeyword. - To select unique records we can use
DISTINCTkeyword. - Precedence of arithmetic operators of SQL
The WHERE Clause
In this section, we're going to look at the WHERE clause in SQL. In the previous section, I told you that we use WHERE clause to filter data. For example, let's say we only want to get the customers with points greater than 3000. So, we can write the condition in the WHERE clause as:
SELECT * FROM customers WHERE points > 3000;
When we execute the above query, the query execution engine in MySQL is going to iterate over all the customers in the customer table. For each customer, it's going to evaluate the condition points > 3000. If the condition is true, it will return that customer in the result set. Execute the query above and observe the output.
Output:

As you can see from the result, you have only 2 customers with points > (greater) 3000. SO the operator (>) we use after the where clause is Greater than operator, which is one of the comparison operators in SQL.
Comparison operators in SQL
- >: Greater than
- >=: Greater than or equal to
- <: Less than
- <=: Less than or equal to
- =: Equality or equals
- != or <>: Not equal to
Let us use these operators to demonstrate an example. The output is ignored for brevity.
Getting all customers whose points are greater than or equal to 3000.
SELECT * FROM customers WHERE points >= 3000;
Getting all customers whose points are less than 3000.
SELECT * FROM customers WHERE points < 3000;
Getting all customers who live in the sate of VA.
SELECT * FROM customers WHERE state = 'VA';
Whenever you are dealing with a sequence of characters or strings (Textual data), you need to enclose your values with either a single quote or double-quotes. By convention, we use a single quote.
Getting all customers who are not from the state of VA.
SELECT * FROM customers WHERE state != 'VA';
This also denotes the same as above.
SELECT * FROM customers WHERE state <> 'VA';
Let us get all customers who are born after the year 1990:
SELECT * FROM customers WHERE birth_date > '1990-01-01';
Date format can also be given in string format. The standard or default format for representing date is
YYYY-MM-DD.
Take away from this section
- Different comparison operators in SQL.
- We represent a sequence of characters or strings in single or double quotes. Single quote by convention.
- Default format for representing date :
YYYY-MM-DD.
The AND, OR, and NOT Operators
In this section, I'll show you how combine multiple search conditions when filtering data. So, let's say we want to get all the customers that are born after 1st January 1990, who also happen to have more than a 1000 points. So this is where we use the AND operator.
So, this is how er use AND operator.
SELECT * FROM table_name WHERE condition1 AND condition2;
When using
ANDoperator both the conditions should be true.
An example from the table customers.
SELECT * FROM customers WHERE birth_date > '1990-01-01' AND points > 1000;
After we execute the above query, we only get customers who have both the above conditions.
In contrast to the AND operator we have the OR operator. So, with OR if at least one of the condition is true, that row will be returned in the result set.
SELECT * FROM customers WHERE birth_date > '1990-01-01' OR points > 1000;
The above query will return customers whose records satisfies at least one pf there conditions, whose birth_date is after 1990-01-01 or whose points greater than 1000.
Now, let us take this to the next level. Let's say we want to get customers who are either born after 1990, or they should have points greater than 1000 and live in VA, so this is how the query looks like:
SELECT * FROM customers WHERE birth_date > '1990-01-01' OR points > 1000 AND state = 'VA';
Now, when combining multiple logical operators you need to be aware of the order of precedence of these operators.
Following list shows the operators with their precedence from high to low as you go from top to bottom.
- NOT
- AND
- OR
When the above query is executed, the query execution engine first evaluates the points > 1000 AND state = 'VA' condition, because we are using an AND operator. It doesn't matter what we typed out the condition after the first condition because the AND operator has higher precedence. Now you can always change the order using parenthesis() and it also makes your code cleaner and easier to understand. So, we can put parenthesis () around the second condition like:
SELECT * FROM customers WHERE birth_date > '1990-01-01' OR (points > 1000 AND state = 'VA');
Anyone who reads the query above can easily understand the intent of the query.
Now, we also have another logical operator called NOT. And we used that to negate a condition.
SELECT * FROM customers WHERE NOT (birth_date > '1990-01-01' OR points > 1000);
The above query is equivalent to the query below without NOT operator which is more easier to read and understand.
SELECT * FROM customers WHERE birth_date <=> '1990-01-01' AND points <= 1000;
Take away from this section
- Precedence of logical operators of SQL
- Usage of
AND,ORandNOT
The IN Operator
In this section, I'm going to show you how to use the IN operator in SQL.
So, as an example, let's say you want to get the customers located in VA or FL or GA. One way to write the query is like this:
SELECT * FROM customers WHERE state = 'VA' OR state = 'FL' OR state = 'GA';
If you execute the query, you'll get customers located in FL, VA and GA. But there is a shorter and cleaner way to get the same result. Instead of combining multiple conditions using the OR operator, we can use the IN operator as:
SELECT * FROM customers WHERE state IN ('VA','FL','GA');
The order inside
INdoesn't matter.
This query is exactly equivalent to what we wrote earlier, but you can see it's shorter and easier to understand. If we execute the query, we get the same result as above.
Here we can also use the NOT operator as:
SELECT * FROM customers WHERE state NOT IN ('VA','FL','GA');
Take away from this section
- Use the
INoperator whenever you want to compare an attribute to a list of values.
The BETWEEN Operator
In this section, we're going to look at the BETWEEN operator in SQL.
So, let's say we want to get customers who have more than 1000 points and less than 3000 points. So, the query looks like:
SELECT * FROM customers WHERE points >=1000 AND points <=3000;
Now, whenever you're comparing an attribute with a range of values, you can use the BETWEEN operator, and it makes your code/query shorter and cleaner. So, we can re-write the above query as:
SELECT * FROM customers WHERE points BETWEEN 1000 AND 3000;
The query is exactly equivalent to what we had before, so the range values are also inclusive, that means points is going to be greater than or equal to 1000 or less than or equal to 3000.
Take away from this section
- When comparing the range of values use
BETWEENoperator.
The LIKE Operator
In this section, I'm going to show you how to retrieve rows that match a specific string pattern, for example, let's say we only want to get the customers whose last_name starts with b. So, we can write a query as:
SELECT * FROM customers WHERE last_name LIKE 'b%';
The % sign in the quote indicates any number of characters, you may have one character after b or no characters or 10 characters, with this pattern we get all the customers who's patterns starts with b. And also it doesn't matter if it's an upper-case or lower case b.
Now, the % sign doesn't have to be at the end of the pattern, and it can be anywhere. For example, let's say we want to search for customers who have an e in their last_name, whether it's at the beginning, in the middle or at the end, so we can change the pattern to %b%.
SELECT * FROM customers WHERE last_name LIKE '%b%';
The pattern in the above query means we can have any number of characters before or after b.
Let's take another example. We want to get the customers who's last_name ends with a. So, the query looks like:
SELECT * FROM customers WHERE last_name LIKE '%a';
We also have _ underscore sign, and it matches a single character.
SELECT * FROM customers WHERE last_name LIKE '_a';
So, with the pattern in the query above you get customers who's last_name is exactly two characters long, we don't care what the first character is, but the second character should be a.
Let's take another example. We want to get customers whose last_name starts with b and ends with a, and it should be exactly 5 character long, then we can write the query as:
SELECT * FROM customers WHERE last_name LIKE 'b____a';
LIKEoperator in MySQL is an older operator. But we also have a newer operator which is more powerful, and it allows us to search for any string pattern. It is theREGEXPoperator.
Take away from this section
- We use
%to represent any number of characters. - We use
_to represent a single character.
The REGEXP Operator
In this section, we'll look into REGEXP also called regular expression operator.
Let's take an example. Let's say you want to search for the customers who have the word trai in their last_name. So, the query looks like:
SELECT * FROM customers WHERE last_name LIKE '%trai%';
The word trai can be anywhere in the last_name. We can write the above query using REGEXP which is short for the regular expression, and regular expression are extremely powerful when it comes to searching for strings. So, they allow us to search for more complex patterns.
Let's take an example: let's write the above pattern using a regular expression.
SELECT * FROM customers WHERE last_name REGEXP 'trai';
In the case of REGEXP, we don't have to type out the % sign. The two queries above are exactly identical.
Now, here in the regular expression, we have additional characters that we don't have while using LIKE operator. For example, we can use the carrot (^) sign to indicate the beginning of a string. So, if I put ^ just before the word trai -> ^trai, it means the last_name should start with trai, so we use carrot (^) sign to represent the beginning of a string.
SELECT * FROM customers WHERE last_name REGEXP '^trai';
We use dollar ($) sign to represent the end of the string. So, the pattern trai$ means the last name must end with trai.
SELECT * FROM customers WHERE last_name REGEXP 'trai$';
We can also search for multiple words here, for example, let's say we want to find the customers who have the word trai or ape in their last_name, so we use a pipe (|) operator. So, we can write the pattern as:
SELECT * FROM customers WHERE last_name REGEXP 'trai|ape';
Now we can take this to the next level. Let's say we want to find customers who have the word trai or ape or sur in their last name.
SELECT * FROM customers WHERE last_name REGEXP 'trai|ape|sur';
We use pipe (|) symbol to represent multiple search pattern.
Note: For simplicity, I'll write the patterns only from now on. You can always replace it in the query.
^trai|ape|sur- This pattern means the last_name should either start with the wordtraior it should have the wordapein it or the wordsurin it.trai$|ape|sur- This pattern means the last_name should either ends with the wordtraior it should have the wordapein it or the wordsurin it.
Now, let's look at another example. Let's say you want to search for customers who have an e in their last_name.
SELECT * FROM customers WHERE last_name REGEXP 'e';
So, now we want to make sure that before the letter e, we should either have a g or an i. So, this is where we can use square brackets [].
SELECT * FROM customers WHERE last_name REGEXP '[gi]e';
Inside the bracket, we can add multiple characters as above, and that matches any customers who have ge or ie in their last_name. The square bracket [] can also come anywhere in the pattern.
SELECT * FROM customers WHERE last_name REGEXP 'e[gi]';
In the example above we get any customers who have eg or ei in their last_name.
Now, we can also supply a range of characters, for example, we can have e and just before e we can have [a-h]e.
Take away from this section
^: We use carrot (^) sign to represent the beginning of a string.$: We use dollar ($) sign to represent the end of a string.|: We use pipe (|) sign to search for multiple words in a string.[]: We use square bracket ([]) sign to match any single characters listed inside the brackets.[-]: We use the square bracket with-range ([-]) to represent a range.
The IS NULL Operator
In this section, I'm going to show you how to look for records that miss an attribute.
So if any attribute in a field is missing then that it is NULL. NULL means the absence of a value. Now let's say we want to search for all the customers who don't have a phone. To do that we use IS NULL operator.
SELECT * FROM customers WHERE phone IS NULL;
If we execute the query above, we'll get all the customers whose phone is missing in the record.
So, if we want to get the customers who have a phone, then we can change the query as:
SELECT * FROM customers WHERE phone IS NOT NULL;
The ORDER BY Operator
In this section, I'm going to how to sort data in your SQL queries.
In SQL, the default sorting is done using the primary key. For instance, in our customer table, we have customer_id as a primary key. So, the default sorting is done using the customer_id.
In the relational database, every table should have a
primary key, the value in that column should uniquely identify the records in that table.
So, let me show you how to sort customers by a different column (other than primary_key). We can sort customers by using the ORDER BY clause. So, let's sort customers based on their first_name.
SELECT * FROM customers ORDER BY first_name;
So, we'll get all the customers which will be sorted by their first_name in ascending order. So, if you want to sort in the reverse order then add DESC after the query.
DESCis short for descending.
SELECT * FROM customers ORDER BY first_name DESC;
We can also sort data by multiple columns, for example, let's we want to sort customers based on their state, and then within each state, we want to sort them by their first_name.
SELECT * FROM customers ORDER BY state, first_name;
We can also sort each column separately.
SELECT * FROM customers ORDER BY state DESC, first_name ASC;
Take away from this section
- DESC: To sort data in descending order.
- ASC: To sort data in ascending order.
- default: The default sorting is done using the
primary key.
The LIMIT Operator
In this section, I'm going to show you how to limit the number of records returned from the query.
SELECT * FROM customers;
For example, let's assume, we get 1000 customers after executing the above query. Now, what if we only want to get the first 100 customers. That's where we use the LIMIT clause. Let me show you:
SELECT * FROM customers LIMIT 100;
The above query will only return the first 100 customers.
If the argument we pass in LIMIT is greater than the number of records produced, then we get all the records.
Now, in the LIMIT argument, we can optionally pass the offset, and it is handy in situations where you want to paginate data. For example, let's say we have a website, and on this website, we have a web page for the user to see all the customers in the database. Now for simplicity, let's imagine we want to show only 10 customers per page.
The
LIMITclause should always come at the end of the query. Pay attention to the order of the clauses when writing queries.
So, now my LIMIT clause looks like:
SELECT * FROM customers LIMIT 30, 100;
LIMIT 30, 100: 30 is the offset and 100 is the maximum number of customers we'd like to retrieve.
Take away from this section
LIMITclause should always come at the end of the query.
Inner Joins
So far, we have selected columns from a single table, but in a real-world, we select columns from multiple tables. And that's what I am going to show you in this section.
Let's assume the two tables below:
Table1
Customers Tables:
| customer_id | first_name | last_name | phone_number | state |
|---|---|---|---|---|
| 1 | Pratap | Sharma | 7890873737 | Karnataka |
| 2 | Prasar | Sharma | 7846873737 | Mizoram |
| 3 | Sudip | Baral | 7825273737 | Karnataka |
| 4 | Sangita | Nath | 3450873737 | Assam |
Table2
Orders Tables: In the orders table, we are using the customer_id column to identify the customer that has placed the order.
| order_id | customer_id | order_date | shipper_id | status_id |
|---|---|---|---|---|
| 1 | 1 | 2019-12-07 | 3 | 2 |
| 2 | 4 | 2019-12-30 | null | 1 |
| 3 | 3 | 2020-01-07 | 3 | 2 |
| 4 | 2 | 2020-02-01 | null | 1 |
| 5 | 1 | 2020-02-17 | 4 | 3 |
In this section, I'm going to show you how to select the orders in the Orders table, but instead of showing the customer_id, we'll show full_name of each of the customers. To do that we will use JOIN to combine two tables.
In SQL we have two types of JOIN:
- INNER JOIN
- OUTER JOIN
Here is the Inner Join Syntax:
SELECT column_name(s)
FROM table1
INNER JOIN table2
ON table1.column_name = table2.column_name;
We write condition for join after the
ONkeyword.
So, let us write the query to get all orders and customer full_name mentioned in the result.
SELECT * FROM orders INNER JOIN customers ON orders.customer_id = customers.customer_id;
After executing the query above, we will get all the columns from both the orders table and customers table. We can simplify that by selecting columns.
If we are doing an
INNER JOINwe can skip theINNERkeyword, It will still produce the same result.
SELECT order_id, first_name, state FROM orders JOIN customers ON orders.customer_id = customers.customer_id;
Please execute the queries and test your result. This article is just to help you understand the concepts of SQL.
What if we also want to select customer_id?
SELECT order_id, customer_id, first_name, state FROM orders JOIN customers ON orders.customer_id = customers.customer_id;
If we execute the query above SQL will throw an error, as it will not know which table to select the customer_id from as the column customer_id exist in both the table. So, we can mention the table to pick the column from as below:
SELECT order_id, orders.customer_id, first_name, state FROM orders JOIN customers ON orders.customer_id = customers.customer_id;
If you observe the query above carefully you'll observe that we have repeated the word orders numerous times, the same is true about customers table. We can get rid of this repetition and make our code simpler by using an alias. We can give an alias for the table name right after the table name. Observe the query below.
SELECT order_id, o.customer_id, first_name, state FROM orders o JOIN customers c ON o.customer_id = o.customer_id;
So, this is how we can join columns from multiple tables.
Take away from this section
- Two types of
JOINin SQL.INNER JOINandOUTER JOIN. - We can skip the
INNERkeyword while doing anINNER JOIN. - Use table name alias to avoid repetition.
Joining Across Databases
In the real world, when you work as a developer or as a database administrator, quite often you will have to work with multiple databases. In this section, I'm going to show you how to combine columns from tables in multiple databases.
Consider Table1 and Table2 above are from different database sql_customers and sql_orders databases. So we can join tables of two databases as:
SELECT * from sql_orders.order o
JOIN sql_customers.customers c
  ON o.customer_id = c.customer_id;
Self Joins
In SQL we can also join a table with itself. Let me show you an example.
Table3
Employees Table
| employee_id | first_name | last_name | manager_id |
|---|---|---|---|
| 1 | Pratap | Sharma | null |
| 2 | Prasar | Sharma | 1 |
| 3 | Aman | Sharma | 1 |
| 4 | Sudip | Baral | 1 |
| 5 | Nadeem | Iqbal | 2 |
| 6 | Anup | Kumar | 2 |
| 7 | Anuj | Nath | 3 |
| 8 | Rahul | Dey | 4 |
| 9 | Tandra | Pal | 1 |
Suppose you carefully look at the table above. They are the employees of an organisation. If you see the mnager_id column carefully, you see that it is the id of another employee of the same organisation. For example Pratap is the manager of Prasar, Aman, Sudip and Tandra. Same way Prasar is the manager for Nadeem and Anup and so on.
Let's go ahead and write a query to join this table with itself so we can select the name of each employee and their manager.
SELECT e.employee_id, e.first_name, em.first_name as manager FROM employees e JOIN employess em ON e.manager_id = em.employee_id;
So, joining a table with itself is pretty much the same as joining a table with another table. The only difference is that we have to use different aliases and we need to prefix each column with an alias. This is what we call a SELF JOIN.
Joining Multiple Tables
In this section, I'm going to show you how to join more than two tables when writing a query. If you observe Table2, we also have a status column, which signifies the current status of the order. The Order Statuses table looks like below.
Table4
Order Statuses Table
| order_status_id | name |
|---|---|
| 1 | Processed |
| 2 | Shipped |
| 3 | Delivered |
So, let's write a query to join three tables Table1, Table2 and Table4.
SELECT o.order_id, c.first_name, c.last_name, os.name FROM orders o
JOIN customers c
  ON o.customer_id = c.customer_id
JOIN order_statuses os
  ON os.order_status_id = o.status_id;
So, this is how we can join three tables.
In the real-world s you work on more complex problems, and you'll end up joining even ten tables.
Compound Join Conditions
There are times where we cannot use a single column to identify columns in a given table uniquely. For example, look at the table below.
Table5
Order Items Table
| order_id | product_id | quantity |
|---|---|---|
| 2 | 1 | 2 |
| 2 | 2 | 3 |
| 2 | 3 | 2 |
| 3 | 1 | 4 |
| 4 | 1 | 1 |
In table Table5, we have columns like order_id, product_id and so on. Now, if you look at the data, you can see that the values in the order_id column are repeated. So we cannot use this column on its own to uniquely identify each record. The same is true for product_id column. The value of this column is also duplicated.
So, in this table, we use the combination of values of both order_id and product_id to uniquely identify each order_item.
If a primary key exists more than one column, then we call it as the composite primary key.
Why does composite primary key matters? Well, when you have a table with a composite primary key, you need to learn how to join that table with other tables.
Table6
Order Items Notes Table
| note_id | order_id | product_id | note |
|---|---|---|---|
| 1 | 2 | 1 | first note |
| 2 | 2 | 1 | second note |
So, let's look at the data in Table6, we have note_id which uniquely identifies the records in table table6 next to that we have order_id and product_id. You learn that the combination of these two columns uniquely represents an order item.
SELECT * FROM order_items oi
JOIN order_item_notes oin
  ON oi.order_id = oin.order_id
  AND io.prduct_id - oin.product_id
ON oi.order_id = oin.order_id AND io.prduct_id - oin.product_id: This way of joining table is called aCOMPOUND JOINCondition. We have multiple conditions to join table5 and Table6.
Implicit Join Syntax
In this section, I'm going to show you about the IMPLICIT JOIN syntax in MySQL.
SELECT * FROM orders o JOIN customers c ON o.customer_id = c.customer_id;
Here we have a basic INNER JOIN, and we're selecting everything from the orders table, joining it with customers table, on o.customer_id = c.customer_id.
There is another way to write the query using IMPLICIT JOIN syntax.
SELECT * from orders o, customers c WHERE o.customer_id = c.customer_id;
The query above is called IMPLICIT JOIN syntax.
Even though MySQL supports this syntax, it's something that I suggest you not to use, because if you accidentally forget to type out the where clause, you will get a
CROSS JOIN. I'm going to talk aboutCROSS JOINin the upcoming section.
It's better to use an explicit
JOINsyntax because it forces you to type out the join condition.
Take away from this section
- Better to use explicit
JOINsyntax.
Outer Joins
Earlier in the section, I told you that we have two types of JOIN in SQL. So far, I have given examples of INNER JOIN only. And I also told you that the keyword INNER in INNER JOIN is optional. So, whenever you type out a JOIN, you are using an INNER JOIN. In this section, we are going to look at OUTER JOIN and the problem they solve.
So, I'll start by writing a query which uses INNER JOIN and then I'll convert it to OUTER JOIN.
SELECT c.customer_id, c.first_name, o.order_id
FROM customers c
JOIN orders o
  ON c.customer_id = o.customer_id;
The output of the query above:
| customer_id | first_name | order_id |
|---|---|---|
| 2 | Ines | 4 |
| 2 | Ines | 7 |
| 5 | Clemmie | 5 |
| 5 | Clemmie | 8 |
| 6 | Elka | 1 |
| 6 | Elka | 10 |
| 7 | Ilene | 2 |
| 8 | Thacher | 3 |
| 10 | Levy | 6 |
| 10 | Levy | 9 |
If you look at the result above we see that we get customers with customer_id 2, 5, 6, 7, 8, 10 but customers with customer_id 1, 3, 4, and so on are missing. Currently, we don't have orders for the customers with ids 1, 3, 4 so on, and that's the reason we don't see them in the result set. But what if you want to see all the customers whether they have an order or not. That's when we use OUTER JOIN.
Types of OUTER JOIN
In SQL we have two types of OUTER JOIN.
LEFT JOINRIGHT JOIN
SELECT c.customer_id, c.first_name, o.order_id
FROM customers c
LEFT JOIN orders o
  ON c.customer_id = o.customer_id;
When we use a LEFT JOIN, all the records from the left table, in this case, customers table are returned whether the given condition c.customer_id = o.customer_id is true or not. Execute the query and observer the result.
The output of the query above:
| customer_id | first_name | order_id |
|---|---|---|
| 1 | Babara | null |
| 2 | Ines | 4 |
| 2 | Ines | 7 |
| 3 | Freddi | null |
| 4 | Ambur | null |
| 5 | Clemmie | 5 |
| 5 | Clemmie | 8 |
| 6 | Elka | 1 |
| 6 | Elka | 10 |
| 7 | Ilene | 2 |
| 8 | Thacher | 3 |
| 9 | Romoia | null |
| 10 | Levy | 6 |
| 10 | Levy | 9 |
So, a customer with id 1 doesn't have an order, and that's why we get null in the cell.
When we use a
LEFT JOIN, all the records from the left table are returned whether the given condition is true or not.
Now, what if we use a RIGHT JOIN?
SELECT c.customer_id, c.first_name, o.order_id
FROM customers c
RIGHT JOIN orders o
  ON c.customer_id = o.customer_id;
In this case, all the records from the right table, which is orders table, in this case, are returned whether the given condition is true or not.
The output of the query above:
| customer_id | first_name | order_id |
|---|---|---|
| 2 | Ines | 4 |
| 2 | Ines | 7 |
| 5 | Clemmie | 5 |
| 5 | Clemmie | 8 |
| 6 | Elka | 1 |
| 6 | Elka | 10 |
| 7 | Ilene | 2 |
| 8 | Thacher | 3 |
| 10 | Levy | 6 |
| 10 | Levy | 9 |
You see all the records from the orders table is returned. And the result is exactly the same as the INNER JOIN.
Developers use
OUTERkeyword inLEFT OUTER JOINorRIGHT OUTER JOIN. But, technically, theOUTERkeyword is optional, just like theINNERkeyword.
Take away from this section
OUTERkeyword is also optional, just likeINNERkeyword.- Use
LEFT JOINto select all the records from the left table. - Use
RIGHT JOINto select all the records from the right table.
Outer Join Between Multiple Tables
Similar to INNER JOIN we can use OUTER JOIN between multiple tables. Let me show you.
If you carefully check Table2 we have shipper_id column. The table of shippers is shown below.
Table7
Shippers Table
| shipper_id | name |
|---|---|
| 1 | Abhijeet |
| 2 | Aklesh |
| 3 | Mustafa |
| 4 | Imran |
So, now let's join the orders table with the shippers table to display the name of the shipper in the result.
SELECT
  c.customer_id, c.first_name,
  o.order_id, sh.name AS shipper
FROM customers c
LEFT JOIN orders o
  ON c.customer_id = o.customer_id;
LEFT JOIN shippers sh
  ON o.shipper_id = sh.shipper_id
As a best practice avoid using
RIGHT JOIN, because when you are joining multiple tables, and you haveLEFTandRIGHTandINNERJOIN, things get complicated.
Take away from this section
- Avoid
RIGHT JOINand useLEFT JOINinstead.
Self Outer Joins
Earlier in the guide, we talked about SELF JOIN in SQL. We used Employees table to get all the employees and their manager. So, let's re-write the query to get all the employees and their manager.
SELECT
  e.employee_id,
  e.first_name,
  em.first_name AS manager
FROM employees e
LEFT JOIN employees em
  ON e.manager_id = em.employee_id
The query is pretty same as SELF JOIN.
The USING Clause
We have seen several conditions of JOIN. For example ON c.customer_id = o.customer_id. As the query gets more complex these join conditions get in the way, they make our queries hard to read, but the good thing is that in MySQL, we have a powerful feature for simplifying the queries.
If the column name is the same across the two tables, we are joining, and we can replace the ON clause with a USING clause which is simpler and shorter. Instead of writing ON c.customer_id = o.customer_id we can write USING (customer_id), and they are both identical and is shorter and easier to read.
SELECT
  o.order_id,
  c.first_name,
  sh.name AS shipper
FROM orders o
JOIN customers
  USING (customer_id)
JOIN shippers sh
  USING (shipper_id)
We can use the
USINGkeyword with bothINNERandOUTERJOIN.
SELECT
  o.order_id,
  c.first_name,
  sh.name AS shipper
FROM orders o
JOIN customers
  USING (customer_id)
LEFT JOIN shippers sh
  USING (shipper_id)
The
USINGkeyword only works if the column name is the same across different tables.
Take away from this section
USINGkeyword can be used with bothINNERandOUTERJOIN.USINGkeyword only works if the column name is exactly the same
Natural Joins
In MySQL, we also have another more straightforward way to join two tables, it is called NATURAL JOIN, and it's easier to code. Still, it's something I don't recommend because sometimes it produces unexpected results. But let me show you how it works in case you see it somewhere, so at least you'll be familiar with it.
SELECT
  o.order_id,
  c.first_name
FROM orders o
NATURAL JOIN customers c;
Now, with NATURAL JOIN we don't explicitly specify the column name. So, the database engine will look at these two tables, and it will join them based on the common columns. customer_id in our case. And that is the reason the query above is shorted.
So, NATURAL JOIN is easier to code, but they can be a little bit dangerous because we're letting database engine guess the join and you don't have control over it. For this very reason, NATURAL JOIN produce an unexpected result, and that's why I don't recommend to use them.
Take away from this section
NATURAL JOINare easier to code.- May produce unexpected results.
- Not recommended to use.
Cross Joins
In this section, we're going to look at CROSS JOIN in SQL. We use CROSS JOIN to combine or join every record from the first table with every record in a second table.
Here's an example:
SELECT
  c.first_name as customer,
  p.name as product
CROSS JOIN products p
CROSS JOIN products p - this is an explicit syntax for CROSS JOIN, we also have the implicit syntax which looks like:
SELECT
  c.first_name as customer,
  p.name as product
FROM customers c, orders s
A real example for using CROSS JOIN is where you have a table of sizes like small, medium, large, and a table of colours, like red, green, etc. And then you want to combine all the sizes with all the colours. That is when you use a CROSS JOIN.
Unions
We have covered everything about JOIN, we learned that with JOIN we can combine columns with multiple tables
In SQL we can also combine rows with multiple tables, and this is extremely powerful. Let me show you how this works.
Using Orders Table, we want to create a report to get all the orders, and next to each orders add a label. If the order was placed in the current year, the label is going to be active, and if the order is placed in the previous year, the label will be as archive. The example query below demonstrates the use of UNION operator.
SELECT
  order_id,
  order_date
  'Active' as status
FROM orders
WHERE order_date >= '2020-01-01'
UNION
SELECT
  order_id,
  order_date
  'Archive' as status
FROM orders
WHERE order_date < '2020-01-01'
Using the
UNIONoperator we can combine records for multiple queries.
In the above example both the queries where against the same table, but we can also have queries against different tables and combine their results into one result set.
Let me show you another example:
SELECT first_name
FROM customers
UNION
SELECT name
FROM shippers
With UNION we can combine results from multiple queries. The queries can be against the same table or different table.
The number of columns that each query return should be equal, otherwise you're going to get an error.
SELECT first_name, last_name
FROM customers
UNION
SELECT name
FROM shippers
The query above will throw an error because the first query is returning two columns first_name and last_name while the second query is returning only one column name. MySQL doesn't knows how to combine these records.
Take away from this section
- Using the
UNIONoperator we can combine records for multiple queries. - The number of columns that each query return should be equal
Create table
CREATE TABLE is the keyword telling the DBMS to create a new table. The unique name or identifier for the table follows the CREATE TABLE statement.
Then in brackets comes the list defining each column in the table and what sort of data type it is.
The following example creates a table called customers that contains five columns: customer_id, first_name, last_name, phone_number, and state. The syntax becomes clearer with the following example.:
CREATE TABLE customers (
    customer_id int NOT_NULL,
    first_name varchar(50) NOT_NULL,
    last_name varchar(50),
    phone_number varchar(20),
    state varchar(50),
    PRIMARY KEY (customer_id)
);
The SQL query above is an example, which creates a customer table with an ID as a primary key and NOT NULL are the constraints showing that these fields cannot be NULL while creating records in this table.
Now, you have customers table available in your database which, you can use to store the required information related to customers.
Column Attributes
In this section, I'm going to teach you how to insert, update and delete data from a table. In the previous section we created a table customers. Let us consider a SQL query below:
CREATE TABLE customers (
 customer_id INT NOT NULL AUTO_INCREMENT,
 first_name VARCHAR(50) NOT NULL,
 last_name VARCHAR(50),
 phone_number VARCHAR(20),
 state VARCHAR(50),
 PRIMARY KEY (customer_id)
);
So, from the query above: customer_id, first_name, last_name, phone_number, and state are the columns with different data-types.
- INT : It can hold an integer value. Integers are whole numbers like 1,2,3,4 etc.
- VARCHAR :
VARCHARis known as variable character. And in the parenthesis, you can see50, that means that this column can have a maximum of 50 characters. - PRIMARY KEY: As we can see that
customer_idis a primary key. The values in thecustomer_idcolumn uniquely identify each customer. - NOT NULL: The
NOT NULLshows that the column has to hold some value and can not be empty or null. - AUTO_INCREMENT: This is often used with
PRIMARY KEYcolumn, so every time we insert a new record in this table, we let MySQL or Database Engine insert a value in thePRIMARY KEYcolumn, so essentially it gets thecustomer_idfrom the last row, and it will increment it by one at the time we insert a new record.
Inserting a Single Row
In this section, you're going to learn how to insert a row in a table. For that, we are going to use the INSERT INTO statement. The query example below demonstrates how to insert a row into a table.
INSERT INTO customers
VALUES (DEFAULT, 'John', 'Smith', NULL', 'Karnataka');
The above query will insert a new record to a table. As you can see from the query above we have entered phone_number as NULL which means that it is optional. There is another way of creating a new row.
INSERT INTO customers (first_name, last_name, state)
VALUES ('John', 'Smith', 'Karnataka');
After the column name, we supply the list of column names that we want to insert values into. With that, we don't have to use the DEFAULT or NULL values, and we only supply values to the columns. Now, with the change above, you can re-order the columns. We don't have to list them in the same order, and they were defined.
INSERT INTO customers (last_name, state, first_name)
VALUES ('John', 'Karnataka', 'Smith' );
So, we can list them in any orders.
Inserting Multiple Rows
In this section, you're going to learn how to insert multiple rows in one go.
The query below will insert multiple rows into a table in one single query.
INSERT INTO customers (last_name, state, first_name)
VALUES ('John', 'Karnataka', 'Smith' ),
      ('John1', 'Karnataka', 'Smith1' ),
      ('John2', 'Karnataka', 'Smith2' )
To insert multiple rows, all you have to do is insert a comma(,) after the values followed by another pair of parenthesis().
Inserting Hierarchical Rows
So far, you have only learned how to insert data into a single table.
In this section, I'm going to show you how to insert data into multiple tables. Here is a perfect example.
Look at the columns of Orders Table. We have order_id, customer_id, shipper_id and status_id. But, the actual items for the order are not in this table, they are in the Order Items Table. So, an actual order can have one or more order items. This is what we call a parent-child relationship. So, in this relationship, the Order Table is the parent, and the Order Items table is the child. So, one row in the orders table can have one or more children inside the order items table.
Now in this section, I'm going to show you how to insert order and all its item. So, you'll learn how to insert data into multiple tables.
INSERT INTO orders (customer_id, order_date, status)
VALUES (1, '2020-07-23', 1)

INSERT INTO order_items
VALUES (LAST_INSERT_ID(), 1, 1, 2.95),
 (LAST_INSERT_ID(), 2, 1, 3.95)
If you carefully observer the query above. You see anew thing there LAST_INSERT_ID(). LAST_INSERT_ID is a built-in SQL function which will return the ID that MySQL generates when we insert a new row.
Updating a Single Row
In this section, I'm going to show you how to update data in SQL.
Using the query below, let's demonstrate how to update data.
UPDATE customers
SET last_name = 'Sapkota', state = 'Mizoram'
WHERE customer_id = 1;
We can also update the row to their default values if it exists.
UPDATE invoices
SET payment_total = DEFAULT, payment_date = NULL
WHERE invoice_id = 1;
Updating Multiple Rows
In the previous section, we learned how to update a single record using the UPDATE statement. Now, if you want to update multiple records, the syntax is the same, but the condition you type out has to be more general.
Let's have a look at the query.
UPDATE invoices
SET
 payment_total = invoice_total * 0.5,
 payment_date = due_date
WHERE client_id IN (3, 4)
Using Subqueries in Updates
In this section, we're going to learn how to use sub-queries in an UPDATE statement, it's extremely powerful, so we're going to continue with the previous example, but we're going to make it more interesting.
UPDATE invoices
SET
 payment_total = invoice_total * 0.5,
 payment_date = due_date
WHERE client_id =
 (SELECT
 client_id
 FROM clients
 WHERE name = 'PRATAP)
In the above query, the SQL will run the
(SELECT client_id FROM clients WHERE name = 'PRATAP) first, and then the result of the query will be used as a value for the first query.
What if the query (SELECT client_id FROM clients WHERE name = 'PRATAP) returns more than one row?
UPDATE invoices
SET
 payment_total = invoice_total * 0.5,
 payment_date = due_date
WHERE client_id IN
 (SELECT
 client_id
 FROM clients
 WHERE sate IN('CA', 'VA')
Let's assume the second query in the above query returns more than one row. So we changed the query from WHERE client_id = to WHERE client_id IN.
Deleting Rows
So far, you have learned how to insert and update data; in this section, we'll learn how to delete data. That's very easy.
We use the DELETE FROM statement to delete records from the table.
DELETE FROM orders;
The query above will delete all the records from the table.
DELETE FROM orders
WHERE order_id = 5;
In the query above, it will delete a single record where order_id is 5.
We can also use sub-queries, let's say we want to delete all the orders.
DELETE FROM orders
WHERE shipper_id = (SELECT * FROM shippers WHERE shipper_id = 3);
Conclusion
I assure that you will not find any problem in this MySQL guide. But if there is any mistake, please post the problem here.
You may also want to read Getting Started with Git - A beginner's guide
You may also follow me on LinkedIn and X
💌 If you’d like to receive more tutorials in your inbox, you can sign up for the newsletter here.
Discussions