
As we all know the importance of SEO, so I am writing the steps/ways to improve your SEO. Recently I started my blog which built using GatsbyJS the https://www.gatsbyjs.org/starters/gatsbyjs/gatsby-starter-blog/.
What is Gatsby.JS?
First of all, let us understand what Gatsby is. Gatsby or (Gatsby.js) is a React-based, GraphQL powered, static site generator. It uses powerful pre-configuration to build a website that uses only static files for incredibly fast page loads, service workers, code splitting, server-side rendering, intelligent image loading, asset optimization, and data prefetching.
Run
gatsby new gatsby-starter-blog https://github.com/gatsbyjs/gatsby-starter-blog
Features of Gatsby.js
Here are the features which you'll get on starting your blog using GatsbyJs
- Basic setup for a full-featured blog
- Support for an RSS feed
- Google Analytics support
- Automatic optimization of images in Markdown posts
- Support for code syntax highlighting
- Includes plugins for smooth, beautiful typography
- Includes React Helmet to allow editing site meta tags
- Includes plugins for offline backing out of the box
How Gatsby works?
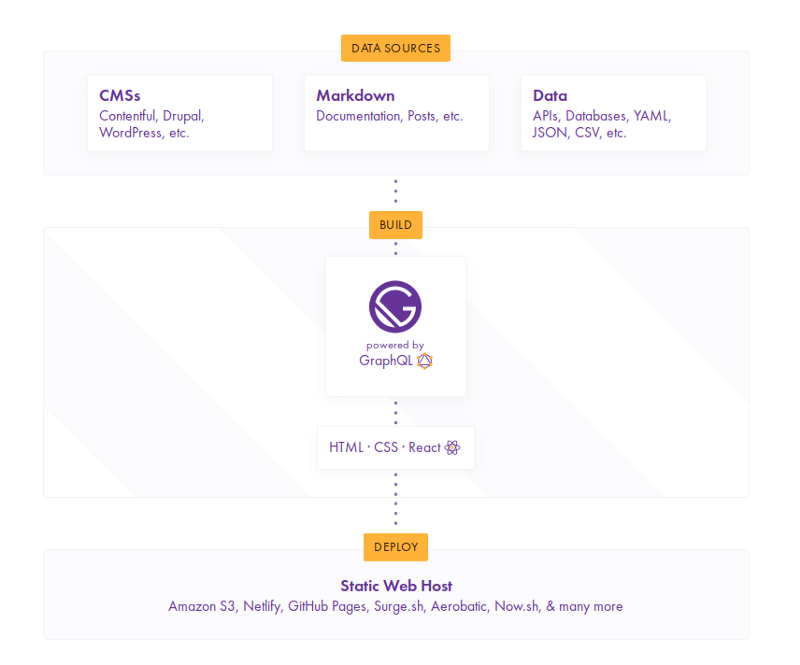
The image above gives the basic to advance working of Gatsby.
Why Gatsby for SEO?
You can create an architecture for your site or app that is SEO driven long before developing your UI. I want to walk you through the things I have learned so far in optimizing a Gatsby site for SEO right from the start.
The SEO component of Gatsbyjs is dependent upon a package react-helmet. Before going forward, make sure the package react-helmet is installed. Along with react-helmet, we would also want to add some other features like sitemap, RSS feed and then finally a robot.txt file to manage how search engines crawl the site. Improving SEO for websites built on Gatsby includes a few numbers of steps.
Install the dependencies
The followings are the dependencies we are interested in:
yarn add gatsby-plugin-react-helmet react-helmet gatsby-plugin-robots-txt
Add the plugin in gatsby.config.js plugin section
module.exports = {
//
  //other code
  plugins: [
    {
    "gatsby-plugin-react-helmet",
    resolve: "gatsby-plugin-robots-txt",
    options: {
    policy: [{ userAgent: "*", allow: "/" }],
    },
    },
    //other plugins
  ]
}
Create SEO Component
Here is how my SEO component looks like:
export default class SEO extends Component {
  render() {
    const replacePath = (path) =>
      path === `/` ? path : path.replace(/\/$/, ``);
    const { postNode, postPath, postSEO, metaDescription } = this.props;
    let title;
    let description;
    let image = "";
    let postURL;

    if (postSEO) {
      const postMeta = postNode.frontmatter;
      title = postMeta.title;
      description = postMeta.description
        ? postMeta.description
        : postNode.excerpt;
      if (postMeta.thumbnail) {
        image = postMeta.thumbnail.childImageSharp.fixed.src;
      }
      postURL = urljoin(config.siteUrl, replacePath(postPath));
    } else {
      title = config.siteTitle;
      description = metaDescription || config.siteDescription;
      image = config.siteLogo;
    }

    image = urljoin(config.siteUrl, image);
    const blogURL = urljoin(config.siteUrl, config.pathPrefix);

    return (
      <Helmet>
        <meta name="description" content={description} />
        <meta name="image" content={image} />

        <meta property="og:url" content={postSEO ? postURL : blogURL} />
        <meta property="og:type" content={postSEO ? "article" : "website"} />
        <meta property="og:title" content={title} />
        <meta property="og:description" content={description} />
        <meta property="og:image" content={image} />

        <meta name="twitter:card" content="summary_large_image" />
        <meta name="twitter:creator" content={config.userTwitter} />
        <meta name="twitter:title" content={title} />
        <meta name="twitter:description" content={description} />
        <meta name="twitter:image" content={image} />
      </Helmet>
    );
  }
}
JSON-LD and Linked-data
JSON-LD
JSON-LD is a lightweight Linked Data format. It is easy for humans to read and write. It is based on the already successful JSON format and provides a way to help JSON data interoperate at Web-scale. JSON-LD is an ideal data format for programming environments, REST Web services, and unstructured databases such as Apache CouchDB and MongoDB.
Linked-Data
Linked Data empowers people that publish and use the information on the Web. It is a way to create a network of standards-based, machine-readable data across Web sites. It allows an application to start at one piece of Linked Data, and follow embedded links to other pieces of Linked Data that are hosted on different sites across the Web.
We are using JSON-LD/Linked-Data to create structured information so that websites can deep link with each other.
Here is how the JSON-LD/Linked-Data would look like
const schemaOrgJSONLD = [
  {
    "@context": "http://schema.org",
    "@type": "WebSite",
    url: blogURL,
    name: title,
    alternateName: config.siteTitleAlt ? config.siteTitleAlt : "",
  },
  {
    "@context": "http://schema.org",
    "@type": "BreadcrumbList",
    itemListElement: [
      {
        "@type": "ListItem",
        position: 1,
        item: {
          "@id": postURL,
          name: title,
          image,
        },
      },
    ],
  },
  {
    "@context": "http://schema.org",
    "@type": "BlogPosting",
    url: blogURL,
    name: title,
    alternateName: config.siteTitleAlt ? config.siteTitleAlt : "",
    headline: title,
    image: {
      "@type": "ImageObject",
      url: image,
    },
    description,
  },
];
After adding the JSON-LD/Linked-Data in our SEO component now it looks like this:
import React, { Component } from "react";
import Helmet from "react-helmet";
import urljoin from "url-join";
import config from "../../blogposts/data/SiteConfig";

export default class SEO extends Component {
  render() {
    const replacePath = (path) =>
      path === `/` ? path : path.replace(/\/$/, ``);
    const { postNode, postPath, postSEO, metaDescription } = this.props;
    let title;
    let description;
    let image = "";
    let postURL;

    if (postSEO) {
      const postMeta = postNode.frontmatter;
      title = postMeta.title;
      description = postMeta.description
        ? postMeta.description
        : postNode.excerpt;
      if (postMeta.thumbnail) {
        image = postMeta.thumbnail.childImageSharp.fixed.src;
      }
      postURL = urljoin(config.siteUrl, replacePath(postPath));
    } else {
      title = config.siteTitle;
      description = metaDescription || config.siteDescription;
      image = config.siteLogo;
    }

    image = urljoin(config.siteUrl, image);
    const blogURL = urljoin(config.siteUrl, config.pathPrefix);
    const schemaOrgJSONLD = [
      {
        "@context": "http://schema.org",
        "@type": "WebSite",
        url: blogURL,
        name: title,
        alternateName: config.siteTitleAlt ? config.siteTitleAlt : "",
      },
    ];

    if (postSEO) {
      schemaOrgJSONLD.push(
        {
          "@context": "http://schema.org",
          "@type": "BreadcrumbList",
          itemListElement: [
            {
              "@type": "ListItem",
              position: 1,
              item: {
                "@id": postURL,
                name: title,
                image,
              },
            },
          ],
        },
        {
          "@context": "http://schema.org",
          "@type": "BlogPosting",
          url: blogURL,
          name: title,
          alternateName: config.siteTitleAlt ? config.siteTitleAlt : "",
          headline: title,
          image: {
            "@type": "ImageObject",
            url: image,
          },
          description,
        }
      );
    }
    return (
      <Helmet>
        <meta name="description" content={description} />
        <meta name="image" content={image} />

        <script type="application/ld+json">
          {JSON.stringify(schemaOrgJSONLD)}
        </script>

        <meta property="og:url" content={postSEO ? postURL : blogURL} />
        <meta property="og:type" content={postSEO ? "article" : "website"} />
        <meta property="og:title" content={title} />
        <meta property="og:description" content={description} />
        <meta property="og:image" content={image} />

        <meta name="twitter:card" content="summary_large_image" />
        <meta name="twitter:creator" content={config.userTwitter} />
        <meta name="twitter:title" content={title} />
        <meta name="twitter:description" content={description} />
        <meta name="twitter:image" content={image} />
      </Helmet>
    );
  }
}
Validate tags
There are actually numerous websites we can use to verify your tags and data. When developing my website, I used the following sources.
- Twitters Card testing tool.
- Googles link for testing JSON-LD: Testing and validating tool for JSON-LD. It goes as far as showing you if there are any missing tags.
- Matatags.io: Great for previewing how your website links will render on all the social media websites.
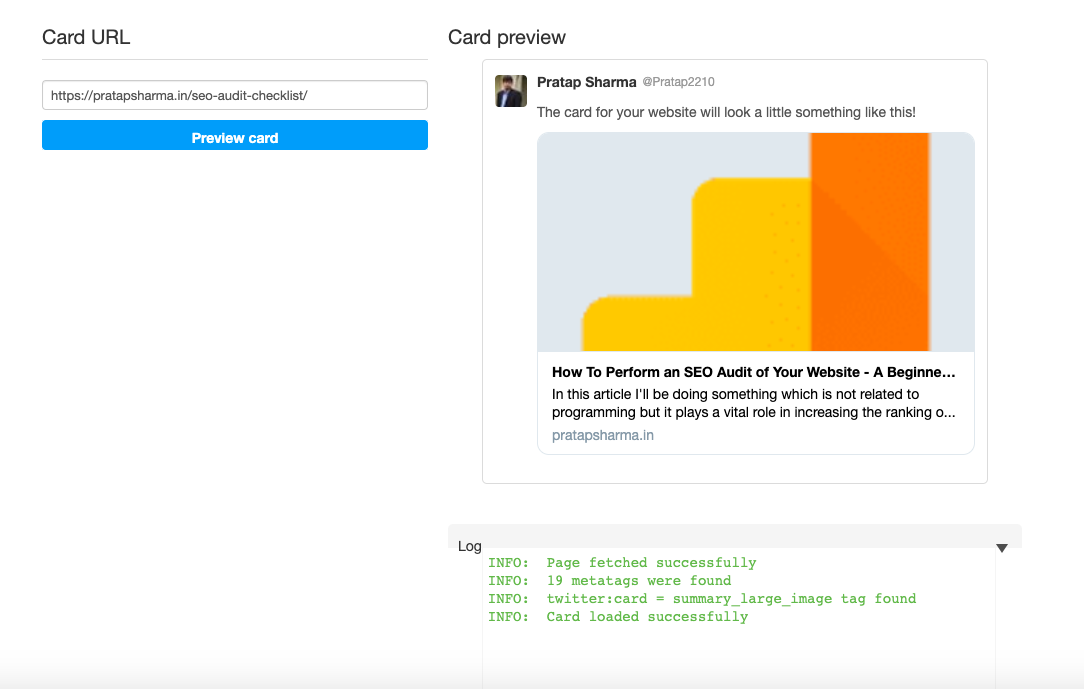
Preview of twitter card of my latest post
Conclusion
If you liked the article, feel free to share it to help others find it!
You may also follow me on LinkedIn and X
💌 If you’d like to receive more tutorials in your inbox, you can sign up for the newsletter here.
Discussions