
In this article, we'll learn how to add views and constraints to widgets using Constraint Layout.
We also can use constraint layout to create flat designs. Constraint Layout can be implemented both through xml and code. Creating layouts using XML has its own advantages like views can be created quickly using the layout editor, and you can check how the layout looks like in the run time.
In order to create a layout using Constraint Layout, we need to use ConstraintSet. Using it, we can add constraints to the widget, define chainings, resize the views etc.
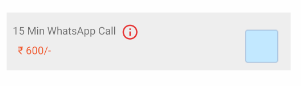
In this example, we will be making layout something like below in order to demonstrate Constraint Layout Programmatically.
Instantiating Constraint Layout
Let us first instantiate ConstraintLayout object by passing context to the constructor.
ConstraintLayout constraintLayout = new ConstraintLayout(this);
constraintLayout.setId(111); // setting a unique id
Let us also add layoutParams to the constraintLayout.
ConstraintLayout.LayoutParams constraintLayoutParams = new ConstraintLayout.LayoutParams(ViewGroup.LayoutParams.MATCH_PARENT, ViewGroup.LayoutParams.WRAP_CONTENT);
constraintLayout.setLayoutParams(constraintLayoutParams);
Adding Widgets in Code
Now, let us add widgets.
As we can see from the image above, what all widgets we'll be needing to create the view. We can see from the view we need two TextView, an ImageView and a checkBox. So let's add them one by one.
TextView for service name:
TextView serviceName = new TextView(this);
serviceName.setText("15 min whatsapp call");
serviceName.setId(1120);
ConstraintLayout.LayoutParams serviceNameParams = new ConstraintLayout.LayoutParams(
        ConstraintLayout.LayoutParams.WRAP_CONTENT, ConstraintLayout.LayoutParams.WRAP_CONTENT);
serviceName.setLayoutParams(serviceNameParams);
TextView for the price:
TextView priceText = new TextView(requireActivity());
priceText.setText("₹ 600 /-");
priceText.setId(1130);
ConstraintLayout.LayoutParams serviceDescParams = new ConstraintLayout.LayoutParams(
        ConstraintLayout.LayoutParams.WRAP_CONTENT, ConstraintLayout.LayoutParams.WRAP_CONTENT);
priceText.setLayoutParams(serviceDescParams);
Now, let us add the above two widgets to my constraint layout and then continue with other widgets.
constraintLayout.addView(serviceName);
constraintLayout.addView(priceText);
Finally let's go ahead and create the remaining views.
ImageView for info Icon
ImageView infoIcon = new ImageView(this);
infoIcon.setId(1140);

infoIcon.setImageDrawable(getResource().getDrawable(R.drawable.ic_info_outline_black_24dp));
ConstraintLayout.LayoutParams infoIconParams = new ConstraintLayout.LayoutParams(
        ConstraintLayout.LayoutParams.WRAP_CONTENT, ConstraintLayout.LayoutParams.WRAP_CONTENT);
infoIcon.setLayoutParams(infoIconParams);
AppCompatCheckBox for checkBox`
AppCompatCheckBox checkBoxItem = new AppCompatCheckBox(this);
checkBoxItem.setId(1150);
checkBoxItem.setPadding(0, 0, 0, 0);
checkBoxItem.setChecked(false);
checkBoxItem.setButtonDrawable(null);
checkBoxItem.setBackgroundResource(R.drawable.checkbox_style);
ConstraintLayout.LayoutParams checkBoxParams = new ConstraintLayout.LayoutParams(
        ConstraintLayout.LayoutParams.WRAP_CONTENT, ConstraintLayout.LayoutParams.WRAP_CONTENT);
checkBoxItem.setLayoutParams(checkBoxParams);
Let us add the two new widgets into our constraintLayout.
constraintLayout.addView(infoIcon);
constraintLayout.addView(checkBoxItem);
We have finally created all the required widgets and added them to our constraintLayout.
Adding Constraints Using ConstraintSet
Now the fun part begins. Adding constraints to each widgets. In order to add constraints to the widgets we need to create an instance of ConstraintSet, and then we'll have to clone our constraintLayout. The below code will create an instance of ConstraintSet and clone the constraintLayout instance.
ConstraintSet constraintSet = new ConstraintSet();
constraintSet.clone(constraintLayout);
Adding constraints to our serviceName widget
constraintSet.connect(serviceName.getId(), ConstraintSet.TOP, constraintLayout.getId(), ConstraintSet.BOTTOM, 18);
constraintSet.connect(priceText.getId(), ConstraintSet.START, constraintLayout.getId(), ConstraintSet.START, 18);
The equivalent to above java code using xml
<TextView
    android:id="@+id/plan_title"
    style="@style/TeDisplay2"
    android:layout_width="0dp"
    android:layout_height="wrap_content"
    android:layout_centerVertical="true"
    android:text="15 min whatsapp call"
    app:layout_constraintStart_toStartOf="parent"
    app:layout_constraintTop_toTopOf="parent"
    tools:text="Journey only Plan" />
And then let us add a constraint to our priceText widget too.
constraintSet.connect(priceText.getId(), ConstraintSet.TOP, serviceName.getId(), ConstraintSet.BOTTOM, 18);
constraintSet.connect(priceText.getId(), ConstraintSet.START, constraintLayout.getId(), ConstraintSet.START, 18);
The equivalent of above java code using xml
<TextView
    android:id="@+id/plan_price"
    style="@style/TeDisplay2"
    android:layout_width="0dp"
    android:layout_height="wrap_content"
    android:layout_centerVertical="true"
    android:text="₹ 600 /-"
    app:layout_constraintStart_toStartOf="parent"
    app:layout_constraintTop_toBottomOf="@id/plan_title"
To complete it one go let us do the same for infoIcon and checkBoxItem too.
//Info Icon
constraintSet.connect(infoIcon.getId(), ConstraintSet.START, serviceName.getId(), ConstraintSet.END, 18);
constraintSet.connect(infoIcon.getId(), ConstraintSet.TOP, serviceName.getId(), ConstraintSet.TOP, 0);

//Checkbox
constraintSet.connect(checkBoxItem.getId(), ConstraintSet.TOP, constraintLayout.getId(), ConstraintSet.TOP, 18);
constraintSet.connect(checkBoxItem.getId(), ConstraintSet.END, constraintLayout.getId(), ConstraintSet.END, 18);
The equivalent to above java code using xml
<ImageView
    android:id="@+id/info_icon"
    android:layout_width="@dimen/material_keyline_24"
    android:layout_height="@dimen/material_keyline_24"
    android:layout_marginStart="@dimen/material_keyline_half"
    android:layout_marginTop="@dimen/material_keyline_2"
    app:layout_constraintBottom_toBottomOf="@id/plan_title"
    app:layout_constraintStart_toEndOf="@id/plan_title"
    app:layout_constraintTop_toTopOf="@id/plan_title" />

<androidx.appcompat.widget.AppCompatCheckBox
    android:id="@+id/check_box"
    android:layout_width="@dimen/material_keyline_24"
    android:layout_height="@dimen/material_keyline_24"
    android:layout_marginStart="@dimen/material_keyline_half"
    android:layout_marginTop="@dimen/material_keyline_2"
    app:layout_constraintEnd_toEndOf="parent"
    app:layout_constraintTop_toTopOf="parent"/>
Applying constraintSet to layout.
Until now, we created different widgets and added constraints to them, respectively. Now we finally need to apply all those constraints set to the constraintLayout. We can apply those constraintSet using the below code. Which will make sure constraints are added and applied to the constraint layout.
constraintSet.applyTo(constraintLayout);
Conclusion
In this article we have learnt how to create an instance of ConstraintLayout, create different widgets add constraints to the widgets and then finally apply the constraints to the ConstraintLayout.
FURTHER READING
- Deep dive into Asynchronous Javascript
- AdSense Snippet injection into Gatsby/React app - Netlify
- Strapi.js - Open Source Node.js Headless CMS
💌 If you’d like to receive more tutorials in your inbox, you can sign up for the newsletter here.
Discussions